How to Fix Broken Hiking Gear in the Field (2026)
A snapped pole or torn pack can end a trip. Our 2026 guide shows you how to fix broken hiking gear in the field with a smart, minimalist repair kit.
There are few sounds more demoralizing on the trail than the sharp crack of a trekking pole on a misplaced step, or the slow, sickening riiiiiip of a pack seam giving way under load. You're miles from the trailhead, deep in the backcountry, and a critical piece of gear has just failed. It’s a moment that can send a spike of panic through even the most seasoned hiker. But it doesn't have to end your trip.
This isn’t about carrying a workshop on your back. It’s about being prepared for the most common failures with a tiny, ultralight kit and the know-how to use it. This is your guide to trailside triage—the art of the quick, effective field repair that gets you back to the trailhead safely and keeps your adventure on track.
In a Rush? Here’s the Bottom Line
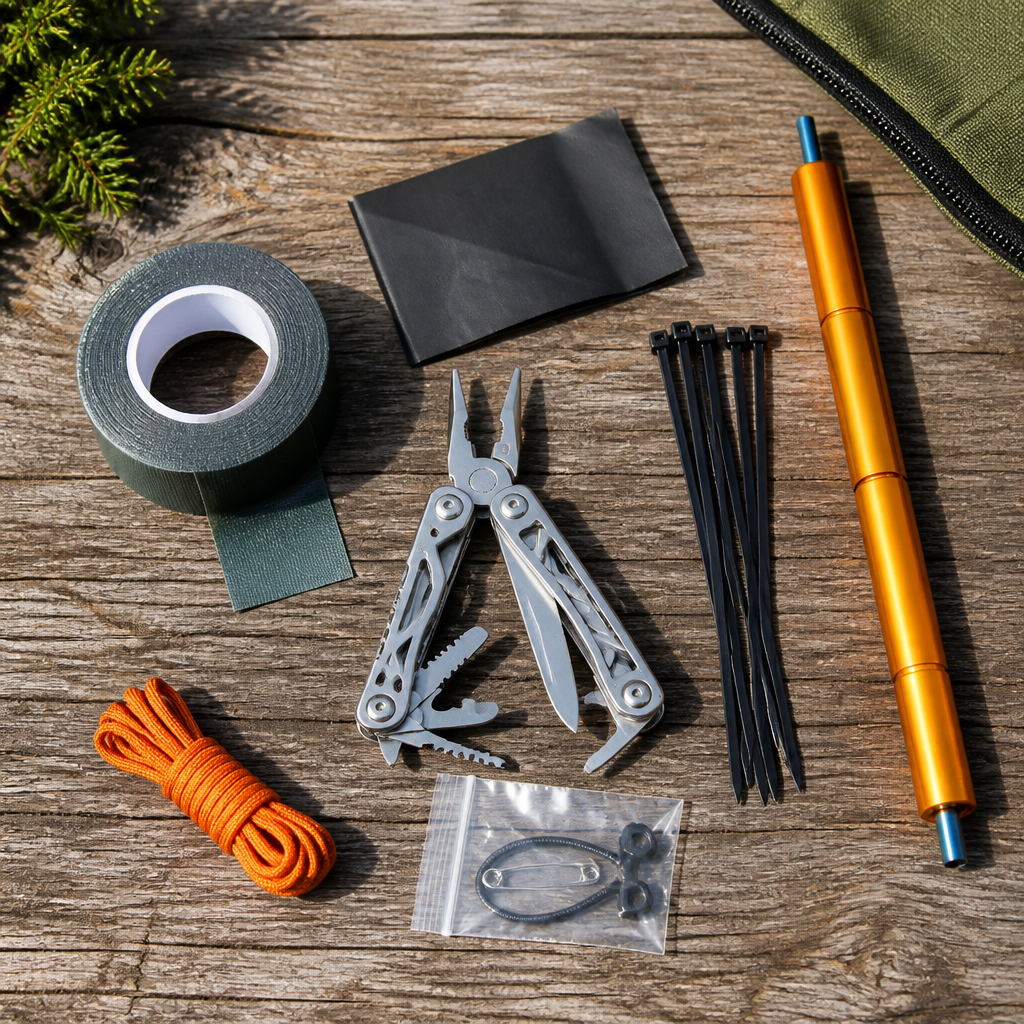
The Fix: Carry a minimalist repair kit built around three core items: flexible adhesive tape (like Tenacious Tape), a sturdy splinting tool (like a tent pole sleeve), and a small multi-tool. These can solve over 90% of common gear failures, from torn jackets to broken poles. The Philosophy: Don't just carry the gear—practice the fixes at home. A five-minute repair in your living room becomes a 30-minute ordeal in the wind and rain. Confidence is your most important tool.
Why Gear Fails: Wear, Tear, and Unfortunate Tumbles
Gear doesn't break just to spite you. Failures almost always fall into one of three categories:
- Material Fatigue: This is the slow death of gear. UV radiation degrades fabrics, repeated folding creates weak points in tent poles, and the constant stress on pack seams eventually wears out stitching. It’s the price of admission for loving our gear hard.
- Acute Trauma: The most common and dramatic culprit. A slip on a wet rock snaps a pole. A snagged branch tears a hole in your new down puffy. You overtighten a hip belt buckle and hear a snap. These are sudden, accidental, and often preventable with careful use.
- Improper Use or Storage: Storing a wet tent can lead to mildew that rots fabric and sealant. Using a trekking pole to pry a rock is asking for a break. Overstuffing a pack puts immense pressure on zippers and seams. Understanding your gear's limits is the first step in preventing its demise.
Step 1: Assess the Damage (Don't Panic)
When something breaks, stop. Take a breath. Drink some water. Rushing a fix often makes it worse. Ask yourself three questions:
- What exactly broke? Is it a seam, a buckle, a pole section, a fabric tear?
- Is this failure critical? A torn stuff sack is an annoyance. A broken tent pole in a storm is a potential emergency. A busted hip belt buckle on day one of a five-day trip is a major problem.
- What's the simplest fix that will get me through? You're not trying to make it factory-new. You're aiming for functional, safe, and stable enough to get you to your next camp or back to the car.
Step 2: The Punctured Pad or Puffy Jacket
A stray spark from the campfire or a thorny branch can instantly compromise your warmth and comfort. A deflating sleeping pad is a recipe for a miserable night, and a leaking down jacket loses its precious insulation. Luckily, this is the easiest field repair.
The Fix: Tenacious Tape is your best friend. This flexible, super-sticky adhesive fabric is the gold standard for field repairs on any kind of nylon, vinyl, or synthetic fabric.
- Clean the area. Wipe away any dirt or moisture. If you have an alcohol wipe, use it for a perfect surface. For down jackets, gently push any escaping feathers back inside.
- Cut a patch. Don't just slap a square on it. Cut a circular or oval patch that extends at least half an inch beyond the tear on all sides. Rounded corners are far less likely to peel up than sharp 90-degree corners.
- Apply the patch. Peel the backing and apply the patch smoothly, pressing firmly from the center outwards to eliminate air bubbles. The adhesive is pressure-activated.
- For sleeping pads: For a stubborn leak you can't see, inflate the pad and submerge it in a lake or stream (or just spray it with your water bottle) to look for bubbles. Mark the spot, dry it, and patch it.
Step 3: The Broken Trekking or Tent Pole
That sickening crack of an aluminum or carbon fiber pole is a classic backcountry bummer. Without a fix, you're looking at a lopsided shelter or a much tougher descent.
The Fix: A splint and tape. Most quality tents (like those from Big Agnes or MSR) come with a dedicated pole splint—a slightly wider aluminum tube designed to slide over a break.
- Straighten the ends. Gently try to align the broken ends of the pole. If it's a jagged break, be careful not to cut yourself.
- Slide on the splint. If you have a pole repair sleeve, slide it over the break so it's centered.
- Wrap it tight. This is the crucial step. Use a strong, non-stretchy tape to wrap the splint tightly to the pole. Start an inch before the splint and wrap past it by an inch. Duct tape works, but medical tape or a high-quality athletic tape like Leukotape is even better as it's less gummy and holds tension well.
- No Splint? Improvise. If you don't have a dedicated splint, find a rigid object. A tent stake, a sturdy stick, or even the metal shank from a hiking boot can work in a pinch. Place it alongside the break and wrap it securely to the pole with tape.
Step 4: The Busted Buckle or Strap
When the main buckle on your Osprey hip belt or a load-lifter strap on your Gregory pack snaps, you'll feel it immediately. The load shifts, the pack sags, and your hike becomes drastically less comfortable.
The Fix: This requires creativity. While some companies sell field-replaceable buckles, you can often rig a solution without one.
- For a non-critical buckle (e.g., sternum strap): You can often ignore it or tie the straps together in a simple knot.
- For a critical hip belt or shoulder strap buckle: The goal is to reconnect the webbing. If part of the buckle remains, you may be able to thread a zip tie through it to secure the other end. If the buckle is completely gone, use two strong zip ties to create a loop on one piece of webbing, and then thread the other strap through that loop and secure it back on itself with another zip tie or a knot. You can also sometimes thread the webbing back through the pack's ladder-lock system to bypass the buckle entirely.
Step 5: The Leaky Water Bladder or Filter
A leak in your water system is a trip-ending emergency. Dehydration is a serious risk. This fix requires immediate attention.
The Fix: Patching and backup purification.
- Find the leak. A tiny pinhole in a Platypus bladder can be found by filling it with air and squeezing. Once found, dry the area thoroughly.
- Patch it. Use Tenacious Tape or a dedicated vinyl repair patch. For leaks near the hose connection, you might need to apply Seam Grip or another urethane adhesive and let it cure (which can take hours).
- The Real Solution: Redundancy. A field-repaired water bladder should not be fully trusted. This is why you should always carry a backup water treatment method. If your primary Sawyer Squeeze filter cracks or the bladder fails, having backup purification tablets like Potable Aqua or a simple bottle you can use them in is non-negotiable.
Gear That Helps: Building Your Trailside Repair Kit
You can buy pre-made kits, but building your own is cheaper, lighter, and tailored to your specific gear. Here are our picks for a bomb-proof DIY kit that weighs next to nothing.
H3: Best DIY Repair Kit Essentials
- The Tape: Gear Aid Tenacious Tape Mini Patches. Pre-cut, compact, and incredibly effective. Wrap a few feet of the standard roll around your trekking pole or a lighter for extra.
- The Splint: A single tent pole repair sleeve. Find one that fits your largest pole (usually your tent pole) and it will work for your trekking poles, too.
- The Multi-Tool: Leatherman Squirt PS4. Tiny, weighs just 2 ounces, and has pliers, scissors, and a knife. The pliers are invaluable for manipulating wire, broken zippers, and jagged poles.
- The Adhesive: Gear Aid Seam Grip + WP. A small tube of this waterproof sealant can fix delaminating boot soles, leaky tent seams, and stubborn bladder leaks.
- The Fasteners: An assortment of 4-6 small and medium zip ties, a #18 sewing needle, and 10 feet of heavy-duty nylon thread (braided fishing line also works wonders).
| Feature | Pre-Made Kit (e.g., Nite Ize Backcountry Kit) | DIY Kit (Our Picks) | | :--- | :--- | :--- | | Cost | ~$20-30 | ~$15-25 (for initial supplies) | | Weight | 3-6 oz | 2-4 oz | | Convenience | Grab-and-go, everything included. | Requires sourcing individual items. | | Customization | Contains items you might not need. | Perfectly tailored to your gear and skills. | | Verdict | Best for beginners or as a simple gift. | Winner. Lighter, cheaper, and more effective. |
Common Mistakes to Avoid
- Forgetting it at home. The lightest repair kit is the one you actually carry. Store it permanently in your backpack.
- Using duct tape for everything. Duct tape is good, but its gummy adhesive leaves a mess and it fails on silicon-treated fabrics. Tenacious Tape is almost always the better choice.
- Not testing your repairs. Don't just slap a patch on and hope for the best. Inflate the pad and lay on it. Fill the water bladder and squeeze it. Put weight on the pack.
- Making things worse. If a fix isn't working, stop. A bad repair can turn a small tear into a huge one. Sometimes, the best solution is to carefully limp back to the trailhead.
FAQ
What's the one repair item I should never leave home without? Tenacious Tape. It is absurdly versatile. It can patch fabric on jackets, tents, and backpacks, serve as a blister cover in a pinch, and even help splint a pole. It weighs nothing and solves a huge percentage of common problems.
How do I fix a broken zipper pull on the trail? This is a classic! If the metal pull tab breaks off, the slider is often still intact. You can thread a small zip tie, a loop of accessory cord, or even a paperclip through the hole in the slider to create a new, functional pull.
Can I use duct tape instead of Tenacious Tape? In an emergency, yes. Duct tape is better than nothing. However, it performs poorly in wet conditions, the adhesive can fail on technical fabrics (like silnylon), and it leaves a sticky residue that's nearly impossible to remove, making a permanent repair much harder later.
Is a multi-tool with pliers really necessary? For day hikes, maybe not. For any multi-day backpacking trip, absolutely. Pliers are essential for bending broken metal, pulling out stubborn thorns or quills, tightening loose stove parts, and manipulating wire for jury-rigged fixes. The tiny Leatherman Squirt or Gerber Dime are worth their weight in gold.
Hike with Confidence
A broken piece of gear is a test of your preparedness, not a sign of failure. By assembling a small, smart repair kit and understanding these basic principles, you transform a potential trip-ender into a minor inconvenience and a great story. Now that your gear is dialed, learn how to keep your body dialed with our guide to preventing blisters on long hikes.